| Cinema 4D Global Illumination |
 |
Overview
One of the most realistic ways to present a model in Cinema 4D is through the use of global illumination. Cinema 4D uses the term Global Illumination to describe their Radiosity solution. Radiosity takes into account direct illumination of each surface, and adds to that secondary illumination — light bounced off other nearby surfaces. The result can be spectacularly realistic, but incredibly time consuming. In this tutorial, I am using the term Global Illumination to describe a method of illuminating an object with a soft, generally directionless light. This allows shadows to pool naturally and highlights the object's surface structure and detail in an ideal way. This is
Radiosity without the bounced light. The problem is that there are a lot of parameters to consider when setting up a global illumination render. Sometimes the results you get from changing a parameter can be counter-intuitive. And test renders can take a really long time when you are tweaking parameters you only half understand.
In this tutorial I will explain all of the control parameters in the Global Illumination tab in Cinema 4D's Render Settings Control panel and how they affect image quality and rendering time.
|
|
This image represents our goal in this tutorial. High settings were used in the Global Illumination parameters to create this image, free of artifacts and rendering errors, but at a cost of long render times. This image took 1hr 16min to render. I've removed the surface textures from the object so that we can concentrate our attention on the way the light interacts with the surfaces and detail.
Lets look at the Global Illumination settings one by one to discover what effect they have on image quality, and rendering time, and to see if we can find that sweet spot between the two.
|
 |
Scene Setup
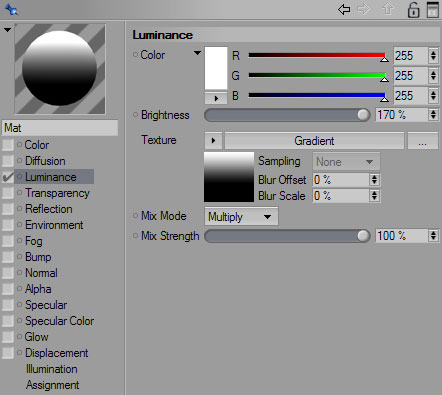
Our object is sitting on a Cinema 4D floor object. I have placed a Sky object into the scene, textured with a white to black gradient. Have a look at this texture setup to see a trick I have used to increase the brightness of the gradient to provide a bit more illumination in the scene. I've multiplied the gradient in the luminance channel, and set the brightness to 170%. This overdriven brightness gives me a higher dymanic range to the brightness in the scene. |
|
|
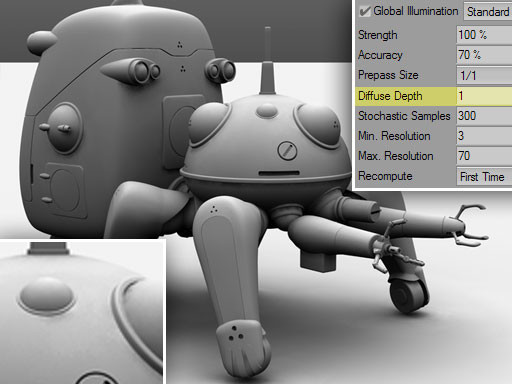
Default Settings
As a starting point, lets try the default global illumination settings in Cinema 4D. Here I have changed the Diffuse Depth value to 1 from the default of 3. This prevents Cinema 4D from calculating the light as it bounces from surface to surface. The results are typical — little artifacts cluster around areas of high detail transition, as can be seen clearly in the enlarged portion of the image. The good news is that the rendering time on this image is only 6min 6sec.
Below the image you can see three roll-over areas. Roll over the point distribution to see how poorly the default settings have placed illumination points on the object in the prepass. This poor coverage is part of the reason for the artifacts in the image. Roll over the results to see the rendered image without the settings and enlargement graphics.
|
|
settings
|
point distribution
|
results
|
|
|
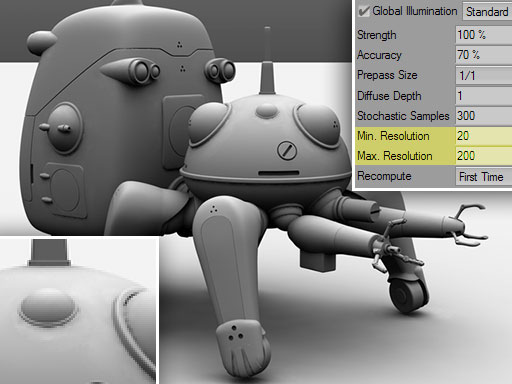
Increase Min. and Max. Resolution
Here I have changed the default values for Min. Resolution and Max. Resolution to 20 and 200 respectively. Min. Resolution controls how densely Cinema 4D places illumination points in flat, undetailed areas of the scene. Max. Resolution controls how densely Cinema 4D places illumination points in curved or detailed areas of the scene. As we can see in the expanded view, this has actually made the artifacts worse. On the other hand, rendering time is actually slightly better than the defaults — 6min.
So what is happening here? We made the rendering worse by increasing parameters that should make it better, and we got a slightly better rendering time even though Cinema 4D had to plot more illumination points? Seems very counter-intuitive, doesn't it? Its results like these that can make Cinema 4D artists tear their hair out in frustration. Read on and I will explain.
|
|
settings
|
point distribution
|
results
|
|
|
How Global Illumination Works
In the pre-pass part of a global illumination render, Cinema 4D looks through the scene and finds areas of low detail, and high detail. It assigns illumination points to these areas based on a combination of three settings in the global illumination parameters - Accuracy (which we have not modified yet), Min. Resolution, and Max. Resolution. These three parameters influence how close together the illumination points are. These illumination points define an illumination mesh which Cinema 4D uses to determine how to light each point of each surface in the scene. The finer this mesh of light, the more accurate the results will be.
Each illumination point sends out rays that test what that it can "see" in the scene. Some rays will hit nearby surfaces, and some rays will reach a source of light — a light object, a luminous texture, or the sky. These rays are called Stochastic Samples in the global illumination parameters. All of the rays from a particular illumination point are averaged together to determine how much light is arriving, and what color the light is, at that point. These rays are sent out in a random pattern - each illumination point sees a different set of samples from the scene, even if they are close together. If the number of samples is low, random chance will cause fluctuations in brightness from point to point. For example, 30% of Point A's random samples manage to directly hit a source of illumination. Point B, right next to Point A, might only manage to have 10% of its random samples hit a source of illumination. The result is that Point B will appear to be darker than Point A, even though in reality they would be receiving the same amount of light. Increasing the number of Stochastic Samples evens out these discrepancies by increasing the odds that adjacent illumination points will see roughly the same proportion of light and dark areas.
More Points Equals More Artifacts?
In the example above, we saw that increasing the Min. Resolution and Max. Resolution values increased the density of the illumination mesh, but the results still had artifacts. The answer to this riddle is that the quantity of illumination points increased when we did this, but the quality of them did not. The artifacts are the results of poor point sampling, not poor point distribution. Making the points closer together also increases the odds that some adjacent points will have lighting discrepancies, resulting in artifacts. We need to increase the number of stochastic samples per point, not necessarily increase the number of points overall.
More Points Equals Less Rendering Time?
Everything has a cost in terms of time. It takes time to calculate the stochastic samples for each illumination point. You can save some of that time by reducing the number of points in a scene. Balanced against this is a different time cost — interpolation time, which increases as you decrease the point sample calculations.
In the second pass of the global illumination render, Cinema 4D interpolates the illumination values between the illumination points, and renders the final image based on this averaged illumination mesh. This interpolation takes time to calculate. There is a point where decreasing the number of illumination points costs you more in interpolation calculations than it saves in illumination point calculations. Everything is a trade off. If you increased the Min. Resolution and Max. Resolution values beyond those listed here, all other parameters staying the same, it would end up taking longer to render again, as the time cost for calculating illumination points would be higher than the time costs for interpolating the illumination. Somewhere in between is the sweet spot, where you have all of the illumination points you need in the scene, no more, and no less, which takes the minimum amount of calculation time possible.
|
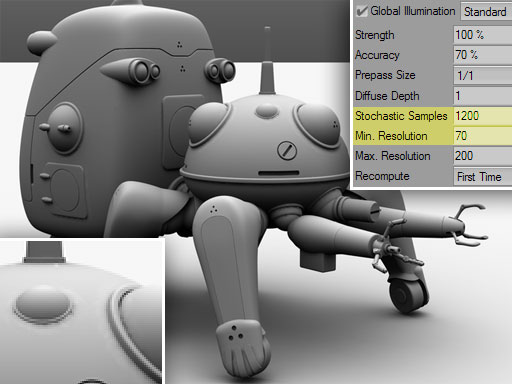
Increase Samples
The answer then would seem to be to crank up the Stochastic Samples value, and get a super accurate render. Unfortunately, the results are still disappointing, both in terms of visible artifacts (although they are much improved), and terms of rendering time — 51min 13sec, |
|
settings
|
point distribution
|
results
|
|
|
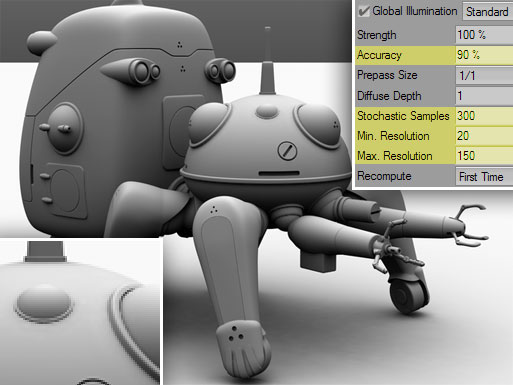
The Correct Answer - Increase Accuracy
The one Global Illumination parameter we have not discussed is the Accuracy setting. This defaults to 70% when setting up a new global illumination render. Think of this value as a multiplier for Stochastic Samples, Min. Resolution and Max. Resolution. For example, when you set your Stochastic Samples to 300, at an accuracy of 70%, you are not really getting 300 samples per illumination point. I do not know the exact formula used, but its helpful to think that you are getting something like 200 samples per point. And at a Min. Resolution value of 70, you are really getting something like 50, and so on. Its not this simple, but its a way of thinking about. So, increasing the Accuracy setting will raise ALL settings simulaneously. In this example, I have lowered the samples back to 300, the Min. Resolution down to 20, and the Max. Resolution to 150. But I have raised the Accuracy to 90%. Voila — the artifacts are now banished, and the render time is an easy-to-swallow 23mins.
Compare the point distribution on this final image with the one above it. You'll see that with a higher accuracy setting, the distribution of the points is smoother, with less abrupt transitions from less detailed to more detailed areas. This also results in fewer artifacts and smoother gradations of shading.
|
|
settings
|
point distribution
|
results
|
|
| close window |
|
|
|
|
|
|
this site works
best on Firefox:
|
|