| A Recipe for Skin | |
|
Overview |
|
| The Basics As in the glass tutorial, I am going to take the surface properties of skin and break them down part by part to explain the settings I will be showing you. All of these skin solutions have some basic settings in common; surface color, specular settings, bump settings, and sheen. Let us deal with these one by one. Skin Color It might come as a bit of a shock, but skin isn't peachy pink (if you are caucasian): it's actually a kind of greenish grey color. The pink coloration comes from light scattering in the blood under the skin. This is why people "turn green" when they are seasick. The blood has drained from their face, revealing the true color of the skin. For reference, look at the thick caluses on your feet—you'll see the color I am talking about. So, for a first pass at skin, set the color channel of a fresh C4D material shader to a yellowish shade. If you want to create skin of other races, you'll be modifiying this base color. More on that at the end of this tutorial. |
|
| Here is the base color for our skin shader. The rendered result looks a bit corpse-like, which is normal—we have not added the effect of the blood coloration yet. | 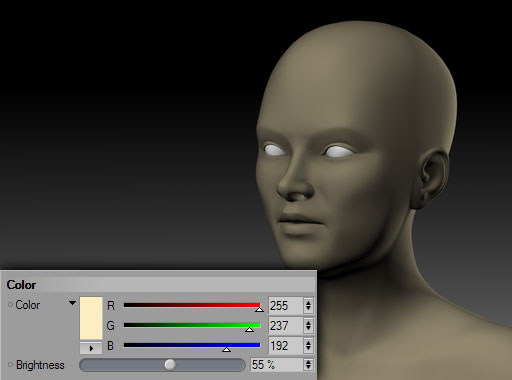 |
|
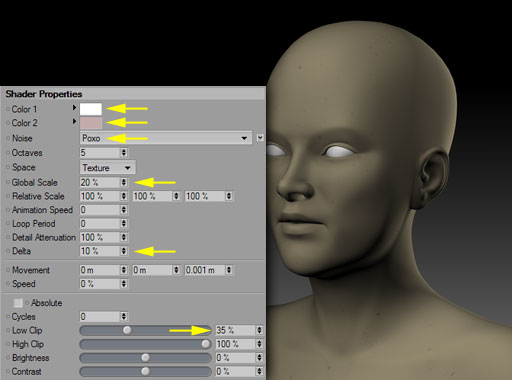
Skin also has a number of imperfections such as freckles, moles, and veins. We can add these to our base color with the use of a Layer shader, and a couple of noise shaders. In the color channel, click the triangle next to the Texture parameter, and select Layer from the list. Set the Mix Mode to Multiply, and then click the black preview square to enter the Layer shader properties. In the Layer shader, click the Shader... button, and select Noise from the drop down menu. Click the small preview square next to the Noise shader, and set it up like the illustration you see here. We are using the Poxo noise shader, which looks like small disconnected patches of color. We will use this to create freckles. Take note of the color setup and the Low Clip setting in this example. You can make the freckles bigger or smaller using the Global Scale attribute of the noise shader. You can make the freckles more or less numerous by adjusting the Low Clip value of the noise shader. You can make the freckles more or less visible by adjusting the brightness of Color 2. |
 |
| To add veins, click the Up Arrow (on the right side of the dialog box, right under the top bar of the window) to return to the Layer shader, and click the Shader... button to add a new layer. Again, select Noise from the list. Set the mixing mode of this new layer to Multiply, set the opacity of the layer to 8%, and then click the small preview square to set the noise parameters. For this we are going to use the Sema noise shader, which looks like stringy, branching paths. We will use this to create veins. Set your parameters up like the example here. You can make the veins larger or smaller with the Global Scale setting in the noise shader. You can make the veins more or less visible by adjusting the layer opacity in the Layer shader. | 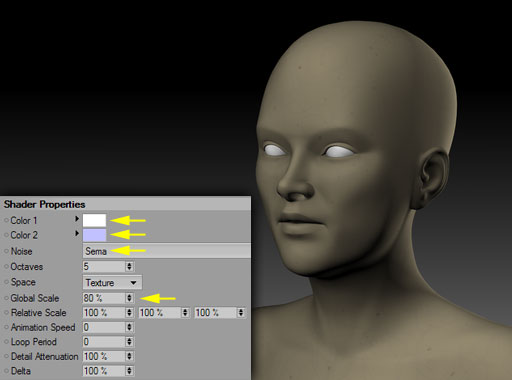 |
| Sheen and Shine Next we will add a couple more characteristics of skin—sheen and shine. Sheen is the property of skin that causes it to reflect more diffuse light at glancing angles. This effect is the result of small hairs and dead skin cells that protrude from the skin's surface that catch and diffuse the light. This is the same effect we get with peach fuzz, or velvet. We could go for a completely realistic solution that involves Cinema 4D's hair module, but that would only be necessary on extreme closeups. For everything else we can fake this effect with a fresnel shader. Shine is the specular quality of skin. Specularity is simply a reflection of bright light sources in the scene. On skin, this is caused by oils and sweat on the surface. By adjusting the amount of specularity, and its hardness, we can make skin look dry, moist, oily, or wet. |
|
|
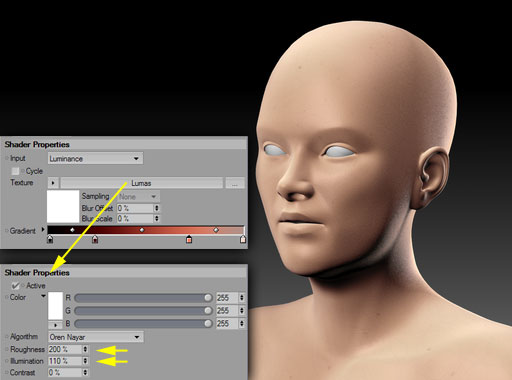
For the sheen, we are going to use a Fusion shader, combining Lumas with Fresnel to create a sheen at the edges where light is shining on the object. In the Luminance channel of our materials setup, add a Layer shader. We are doing this because, aside from the sheen, we are going to be using the luminance channel to add the subsurface scattering effect later. In the Layers shader, click the Shader... button and choose Fusion from the drop down menu. Click on the black preview square to enter the Fusion shader. In the Base Channel, add a Lumas shader and click the preview square to enter the Lumas properties. Turn off all three of the specular hightlights in the Lumas shader, and change its color to white. Set the parameters up like the illustration at the right. Press the Up Arrow to return to the Fusion shader controls. In the Blend Channel, select Fresnel and change the mode to Multiply. Click the preview square under Fresnel and change the gradient to resemble the illustration at the right. As you can see, the Fresnel shader adds an edge sheen to the material. The Lumas shader controls this edge sheen so it only appears on areas that are illuminated by direct light. This will prevent our skin material from glowing in the dark. |
 |
| Now we'll add some shine to our skin. Turn on the Specular channel. I have chosen some very moderate Specular settings here - a width of 66 and a height of 15. Setting the width to a narrower value will make the skin appear more moist. Setting the height will make the skin appear to be wetter. Various values set here can make the skin appear dry (very low specular settings), oily (wider, higher settings), or wet (narrower, higher). Experiement with these to get the desired effect. Turn on the Specular Color channel and change the specular color to a light blue. I do this to counteract the tendency for the highlights to be pushed to yellow, which isn't very realistic. The blue I chose is 203, 219, 255. | 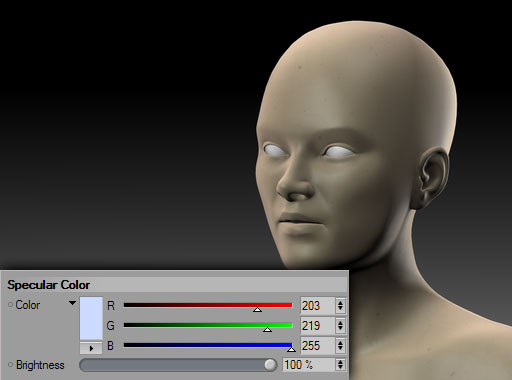 |
| Surface Texture The final base attribute I am going to deal with is surface texture. Even the smoothest skin in the world has a minute grain to it—microscopic wrinkles, pores, and hair follicles. We don't need to be ultra-realistic here. We can use a basic noise shader to break up the texture of the skin slightly to give it a texture that reads as "skin". |
|
| Select the Bump channel of our material setup, and add a Noise shader. The default settings are too large, and too bumpy. Set the Bump Height to 10% Then click on the preview square to enter the Noise shader parameters and adjust them as in the illustration to the right. Take note that as we decrease the Global Scale we also have to decrease the Delta value — otherwise we will get an odd "double image" effect in our bumpmap which would not be desirable. Notice also that I have chosen light grey and white as my noise colors—this knocks back the bump effect and gives us a bit more realistic control with the Bump channel settings. | 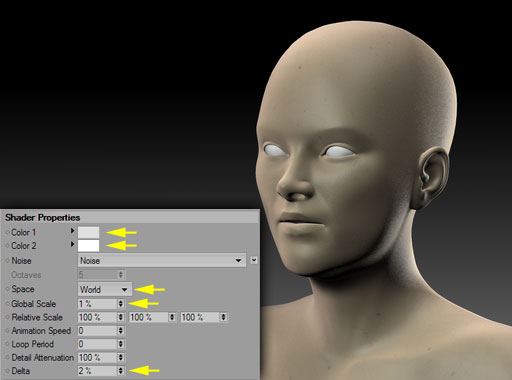 |
| Subsurface Scattering Because Cinema 4D is such a versatile program, there is more than one way to create an effect. I am going to illustrate four different ways to create the effect of subsurface scattering. |
|
|
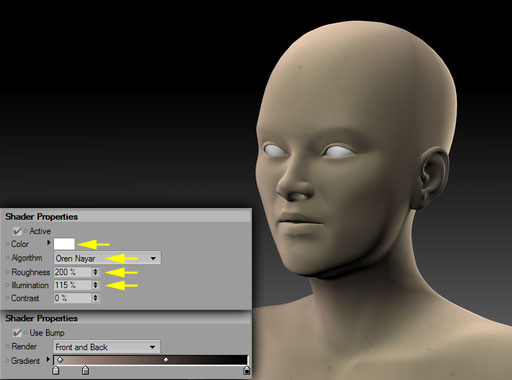
The first of the SSS techniques is a fake, using standard surface techniques to simulate some of the effects of SSS without doing any of the scattering calculations. It's the fastest technique, but not the worst in terms of output. When you render the result, what you should see is a nice pink skin color. The Lumas shader set to Oryen/Nayer with a high roughness value works at a much lower contrast than the standard surface color shader does, so the effect is that the lighting on the skin tends to "bleed" past the illuminated areas. Colorizer takes this low constrast shading and changes its color so that it is redder in dimmer areas. This simulates, to a limited degree, subsurface scattering. |
 |
| The second technique involves the use of the Chanlum shader that comes with Cinema 4D. Chanlum works by averaging the lighting hitting each point on the object. This has the effect of blurring or spreading the lighting around, simulating subsurface scattering. Here, I am using a Fusion shader in the Luminance Layer shader, multiplying the Chanlum shader with a very dark red. One of the problems with this shader is that it is quite sensitive to the scale of your object. In this case, I never was able to achieve a satisfatory setting with the default size of the Meg object I used for this tutorial. I could have scaled the object up to make the chanlum shader work for this tutorial, but this often isn't a valid solution for other projects. The other problem is that this shader isn't very realistic for skin— there is a tendency for the skin to resemble soft plastic instead. |
 |
| What about Cinema 4D's built in Subsurface Scattering shader? Well, it has some problems. First, the controls are not all that intuitive, with several inter-linked controls for adjusting what conceptually should be two attributes—material thickness and scattering strength. It's very difficult to get exactly the effect you want without a lot of tweaking back and forth, which exposes another weakness of the shader— it's very slow to use. Finally, its prone to artifacting—without careful control over the material attributes, you can get effects like interior spaces (eye sockets, mouth interior) showing through the skin surface. | 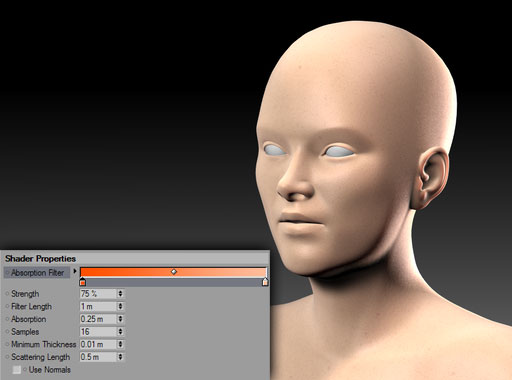 |
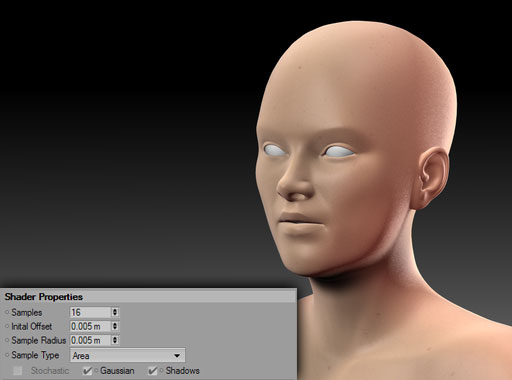
| This is my favorite skin solution. I use a third party plugin called VReel Skin from VReel 3D Entertainment. In this example I have not used very much of the plugin's power, in an effort to keep things as even as possible with the other techniques. Here I am just using the translucent settings in the plugin to create the SSS effect. The advantages are many; faster setup, smoother output, no artifacts, and faster rendering times. | 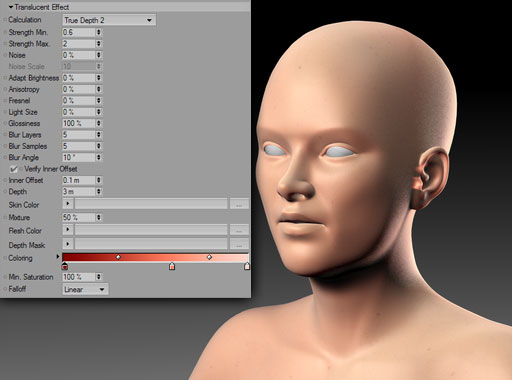 |
| Here is a Quicktime ObjectVR showing the VReel Skin based solution in action. Place your mouse pointer over the image, press your mouse button, and drag the mouse back and forth to move the light source around to observe the subsurface scattering effect from any angle. The material setup for this VR is nearly identical to that illustrated above, with one small difference—the addition of a small amount of Ambient Occlusion added as a scene rendering option. | |
|
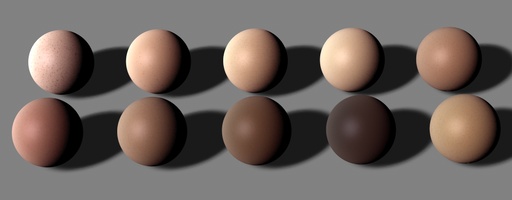
Skin Color Variation This file does not need the VReel Skin shader—I used the fake Lumas technique instead so people without the plugin would be able to use it. I do encourage you to check out the VReel Shader though - it is worth every penny. Click on the image below to download the setup file.
|
|
| close window | |
this site works best on Firefox: |